I did a lot of research when we were ready to send out our own wedding invitations. I knew that we didn’t want to send paper invitations, because we were trying to (1) be environmentally-friendly and (2) keep things cheap (well, actually in this case, FREE) and simple. Digital wedding invitations, it turns out, are also way more convenient for your wedding guests!
If this is intriguing to you but you need some guidance, here you go…!
I’m going to write out our step-by-step process here that will hopefully make the whole thing easy for you. I also made a YouTube video about the process which I’ll put at the bottom of this article when it comes out, for my fellow visual learners out there!
We created very basic (and free) email invitations for our own wedding, but if you’re looking for something fancier and more “realistic”… I recommend you take a look at Greenvelope, which does digital wedding invitations that REALLY look like actual mailed wedding invitations:
Why go with DIGITAL wedding invitations?
For so many reasons! First of all, the guest experience is enhanced when you use digital wedding invitations. And I’ll put save-the-dates in this category as well. I would actually recommend sending a combined save-the-date/wedding invitation to simplify things. Why make it more complicated than it needs to be?
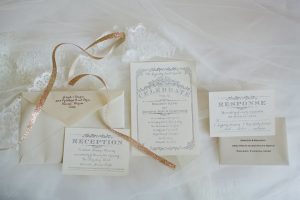
Your guests don’t need a paper wedding invitation with a bunch of little pieces of paper (RSVP card, maps, advice on things to do in the area… etc.). Those little pieces of paper get lost and are annoying… sorry! I know many people disagree with me on this, but I find all that stuff just so unnecessary. We do everything else by email — why are wedding invitations still sent by mail??
When your guests need to know the time and place of your wedding ceremony on the morning of your wedding, wouldn’t it be much easier for them to do a quick search in their email inbox? I think so, anyway!
I also love digital invitations because they’re eco-friendly and cheap (or FREE as we’ll discuss here)!
Step 1: Make a Free Wedding Website
There are a million ways to do this, and you do NOT have to buy a wedding website! There are a bunch of services out there that offer totally free wedding website building. If you want to “shop around” you can also take a look at websites like the Knot, Zola, and WeddingWire.
We ended up using Joy (withjoy.com) after a few rounds of trial and error. I talked more in detail about how I chose our wedding website here if you’re interested.
On Joy, you can customize your website to include all of the things that some people also send in the mail. You can put up a schedule for the day, information about your wedding party, etc. etc… all that good stuff.
I liked it because I personally found it really user-friendly and I needed something easy to collect our RSVPs digitally.
So step 1 is to go to Joy and go through the steps to create your own wedding website! However, if you don’t already have a gmail account dedicated SOLELY to your wedding planning, you’re going to need to do that too… I’ll go over that in our next step.
Step 2: Make a Gmail Account JUST for Wedding Stuff
It’s a great idea to have a Gmail account devoted solely to your wedding planning “stuff.” This is because you’re going to be corresponding with vendors, your venue, and your guests and you’ll go crazy mixing all that in with your day-to-day emails.
Another great thing about it is that you can just delete this email account after your wedding if you want, and be DONE with it all!
So make a new Gmail account. It’s super easy and quick to do. You can even make the name of the email something cute like your wedding hashtag or a combination of your names, or something like that!
Now, once you have a Joy account, have set up your wedding website the way you want, and you have a new Gmail account, it’s time to design and send your digital invitations…
Step 3: Design and Send Your Digital Invitations
If you want, you can design and send your wedding invitations for free through the Joy platform. It’s really easy. You just use one of their invitation templates and fill in your names and wedding information.
You then type, copy and paste, or upload an Excel sheet of all of your guests’ email addresses.
Joy will send your invitations for you and collect your RSVPs right there in your account. Easy peasy.
HOWEVER, we decided to use Joy for our wedding website and to collect RSVPs… BUT NOT to send our invitations. We instead sent our invitations directly through Gmail with a link to our Joy website/RSVP page.
Why? We did this because we wanted to be able to write back and forth with our guests directly using our own Gmail. And also because we wanted our wedding invitations to be as SIMPLE as possible — basically just a “You’re Invited” with a photo of us and the place and date of our wedding. It’s essentially a “save-the-date” with a link to our website for “more information.”
I LOVE this model and I recommend it to anyone planning a simple wedding. It makes the invitation easily searchable later for your guests. They can just do a quick search of their wedding inboxes and there it is. And you don’t have to worry about putting lots of details in the invitation itself early on because you can always change and tweak things on the website later! This is the perfect plan for procrastinators and those who don’t like plans set in stone like myself… 🙂
My Digital Wedding Invitation
I’m the first to admit that our wedding invitation is not SUPER GORGEOUS and that many people will do this much nicer than we did! But it’s simple, cheap, and gets the job done! And some of our guests have told me that they appreciate the simplicity and ease of this invitation, which is always what I want to hear.
Here’s a screenshot of our email invitation, which only has our names, the location, and the (old) wedding date (we had to postpone due to 2020 events, like so many other couples!):
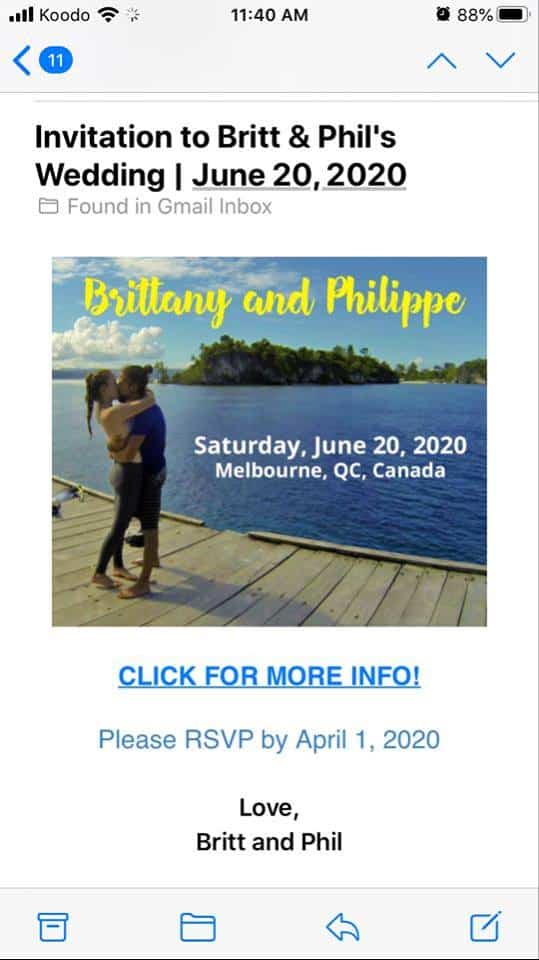
It was important to put as little information as possible so that guests HAVE to click for more information on the website. If you don’t do this, many guests will never even bother to go to your wedding website!
To send it to our guests, we just copied and pasted our guests’ email addresses, BCC’d everyone, and SENT IT! DONE 🙂
More Benefits of Digital Wedding Invitations
Another great thing about using a Gmail account to send your wedding invitations is that, if anything goes wrong or changes, it’s so easy to just send follow-up emails to all of your guests at the same time. So for example, we had to postpone everything due to Covid, and it was SO EASY to inform all of our guests about it.
Some of my friends were stressed because of the paper-invitation wedding timeline and uncertainty of when to send them out. We never had to worry about this. We could just keep our guests informed and in the loop immediately at all times because of DIGITAL wedding invitations!!
Good luck everyone 🙂 🙂 Simplify and ease your wedding planning stress where possible!